Showing posts with label The Green Pinky. Show all posts

March 31, 2015

The Green Pinky Series: Starting Seeds Indoors


Hi friends! Today I wanted to share with you some tips for starting your own garden seeds indoor. Growing up I lived in a suburban neighborhood in a home with a lavish flower garden on every side of the house. The last thing I wanted to do was to help my mother water the flowers. It wasn’t until high school when I took a plant science class that my love for horticulture started. The idea that I could put a seed into the soil, water it, give it some fertilizer, and magically see it grow over the next few months caught my heart and I’ve loved it ever since.

“The Green Pinky” is a play on words. Everyone that knows someone who can keep plants alive will usually refer to said person as having, “A Green Thumb”. But here is a secret… a  gardeners secret. We’ve killed plants… sometimes we continue to kill plants even after years of experience. That’s how gardeners learn the art. You could do everything right, and then a pest takes over the entire crop. So then next year, you spray for the pest or use other non-chemical methods to make sure that pest doesn’t take over this years crop. You make mental notes or write down what worked and what didn’t. Everyone’s growing environments are completely different and no one starts out as a master gardener.

If you aren’t a green thumb yet, no worries! It takes time and practice… and of course remembering to water your gardens.

July 30, 2014

garden 2014


024

“If you want to be happy for a lifetime, be a gardener” – Anonymous

At the age of 28, I realize that having a garden has filled a piece of my sole. There is something about sowing that first seed, watering, feeding it, & watching the plant grow into a thriving, living, beautiful life form that completes you. Knowing that when you harvest your crop that you had a hand in sustaining life.

This summer has been absolutely amazing for the Iowan Gardener like myself. We had record rainfall in June with below temperatures in July. I can remember last year having to haul my garden hose down to the hill and across the yard every other day to keep my plants from wilting and dying from the 90… 100+ degree temps. This year I have been away weeks on end due to work trips and have not worried once whether my husband would remember to water the garden, nature did it for me.

Gardening has always been a hobby that {G} and I enjoy spending time on together. We usually split the chores in the garden. {G} tills and helps sow the seeds. I water, plot out the garden, and transplant the seedlings into the soil. {G} fertilizes and sprays for pest. I maintain by stringing tomatoes, cutting back vines, and spread out the straw as mulch. During the harvest season we like to walk down to the garden in the evenings and talk about what has changed from day to day. We also enjoy harvesting the crop together.

I believe that couples that garden together share something special. I can see it in my best friend who also has a husband that shares a love of gardening. Like us, they work together in maintaining, harvesting, and canning their crops. Many of us use different strategies… Organic… no spray… spray… alternate practices but I believe that’s why our relationships thrive. Call my silly but I believe that Conversations/ Discussions about how you will grow your garden can compare to many discussions you have about other things in your marriage. How do you prepare for other events in your life? How to do care for personal property? How do you set aside time? How do you deal with set backs and disappointments? There is so much joy and pride that goes into gardening that can reflect in a relationship.

This week our first round of red potatoes were ready to harvest. We have never planted potatoes before so we weren’t sure what to expect. I can’t find words to express our excitement when we dug and had whole, red, bug free, beautiful potatoes in our hands. We were giddy with excitement and couldn't wait to cook them up for supper. What a way to bond. What a special moment to share.

030

Home made potato salad. Potatoes from the garden and eggs from our chickens.

022

Since I love my garden so much I wanted to share it with you. Here is a little tour of our garden.

005

West side of garden. Potatoes, Melons, Pumpkins, Broccoli, and Peas

007

East side of Garden. Cherry Tomatoes, Big Boy Tomatoes, Cucumbers, and Peppers

006

Broccoli

013

Jack be Little Pumpkin

014

Watermelon

011

Potatoes

010

Peas

009

Cucumbers

015

The Fruits of Our Labor.

Coming from living in a suburban neighborhood I couldn’t have told you the first thing about vegetable gardening 10 years ago. My mother is a green thumb in floral gardens. Beautiful gardens that wrap the house and the curbs, ponds with lily pads and Hostas as big as your body. But never vegetables. I learned over the years through FFA involvement in high school, becoming an Ag major in college, and working at the Horticulture farms about technic. However, in all honesty, garden is trial and error. You can’t expect perfection in your first garden. Plants will die. Sometimes in the first week. You learn, you read, and you try again next year. Just give it a try, I bet you will surprise yourself.

If you ever have questions about gardening I’d be happy to try and answer them. I’m not an expert but I think we’re doing pretty well.

August 5, 2013

The Green Pinky: Attack of the Squash Bugs

As stated at the beginning of my Green Pinky Series, I am a rookie when it comes to gardening and continue to learn from one season to the next. The whole point of sharing my knowledge is so that you can learn from my mistakes as well.

Two weeks ago I was excited to see that our pumpkins had started to fruit! They were looking healthy and were still growing at a steady rate.

Last week, about Tuesday, I walked out to the garden to see that a few of our pumpkins vines were wilting pretty badly and that something had killed a cucumber vine completely off. I thought to myself… well I haven’t watered this week so maybe everything needs a little soak.

On Friday evening I was looking through the zucchini to harvest anything there when I spotted what I thought were stink bugs. I thought to myself, well that's a little weird but didn’t really think it was anything to be really worried about.

…. Ha ….

There was my mistake.

On Sunday, I noticed more vines were dying and any pumpkins that had started to fruit were becoming mush. I looked on the underside of the leaves and sure enough little clusters of orange eggs were there. I told my husband to grab some insecticide and spray while I figured out what was eating our plants.

Sure enough… those “stink bugs” I saw were really Squash bugs. The picture was exactly what I saw and the orange eggs were spot on.

025

024

Squash bugs bite into the vines and inject a poison which wilts the leaves and kills the plants.

026

As {G} sprayed the squash bugs came out of the wood work. So many of them running for the hills!

I think we are too late. You can see the wilt in this picture. So sad.

030

We decided to spray everything to cover our bases. Some more cucumbers are starting to die off but I’m okay with that since I feel I have gotten what I’ve wanted out of them for the season. Now the pumpkins upset me since they were doing so well.

{Healthy Cucumber}032

Cucumber starting to wilt…

033

One pumpkin that was growing pretty well … So disappointing 

034

What I have learned:

Squash Bugs will suck the life out of your plants. Even if plants are looking healthy and getting along well you should take necessary precautions to protect them. For those that are more on the organic side using netting can help prevent squash bug infestations. For people like me that are okay with pesticides and herbicides, spray preventative substances before signs of pest take a hold of your crop.

We are already making sure that we cover our bases on the watermelon. This one below is our biggest yet!

021

Here are my cucumbers!

037

I made pickles with half of the cucumbers and plan to pickle the rest!

039

YUM!

Hopefully you are now aware of squash bugs and can take the steps to insure that your crop makes it through the season.

July 17, 2013

The Green Pinky Series – Mulching Your Garden

It’s mid-July already! I hope all of your gardens are showing signs of life!

059

So far I have harvested 5 cucumbers and 3 Pickling Cucumbers!

With the regular cucumbers I’ve been trying to be creative rather then just putting them on my salads. This cucumber Salad was delicious!

003Cucumber Sliced thin

Mayo

White vinegar

Salt/Pepper

Garlic Powder


I also canned pickles for the first time ever! Too bad it takes a little time before I can try them to see if it was a success. You can’t mess up pickles… Can you?

067

As I was watering the garden I saw that our Cherry Tomatoes are starting to turn! I have also seen flowers on my pepper plants, and mini squash are in sight! In the next two week we’ll be in full harvest/canning/figure how to use it all mode!

I really must say that I have full faith that because we mulched this year our garden is much healthier.

Why Mulch?

If applied thick enough it will smother the weeds so that you won’t need to spend all summer pulling weeds.

Weeds are not only an eye sore but they will over take all of the nutritional needs from your soil that your vegetables need!

You will not need to use herbicides in your garden… less chemical use is always nice.

Go the CHEAP route!

I spent $0 on mulch this year thanks to my husband. He wanted to test out his square hay baler to get it ready for Hay season so he cut one of our fields and since the grass had no nutritional value I got to use the bales for mulching around our property!

SCORE!

{Watermelons}

016

{Tomatoes}

012

{Cucumbers}

014

{Squash}

015

{Sweet Corn} 

018

Even good for flower beds!

020

Because I mulched so thick I only have to weed a few little stinkers that come up every once in awhile. Once our garden season is over we will till all of the mulch into the soil to decompose over winter and rejuvenate our garden for 2014!

If your not from a farm come up with other cheap solutions to mulching like saving your grass clippings in a compost pile.

I also wanted to share some Hay photo’s from over the July 4th weekend. while you were all out on boats, at beaches, and picnics I was helping {G} Bale and stack 348 hay bales.

{July 3rd, 2013}

027

{Photo from day two. First half of field was baled and stored}

035 

028

029

038 

041

“You have to make Hay while the Sun’s Shining” - unknown

June 26, 2013

The Green Pinky: How to Stake/String Tomatoes

Well my friends, its about that time when your tomatoes should be at medium growth and now need a little bit of support to properly grow. Today I’m going to show you an easy way to prop up your tomatoes with out using tomato cages… this method is called Stringing/Staking tomatoes.

084

Why not just cage them?

Cages can start to become expensive when you plan to have a large garden. They also take up more space when you go to store them during the colder months.

What you need:

  • Post or garden stakes
  • Twine

Steps:

  1. Begin by placing the garden stakes every third or forth tomato plant.
  2. Determine the height of where to tie your string on by assessing your plants height. Find the spot on the post that is about 2/3rds the height of the plant.
  3. Tie or knot on the string on the post at the height determined in step 2.
  4. Run the string down to the next post and at the same height wrap the string around the post. Pull tight for tension so that the string does not sag
  5. Continue running string to each post wrapping the string at each point. Once you get to the last stake/post pull tight and continue running the string back to each post. Again wrapping onto the post each time.
  6. IMPORTANT: When running the string back towards the first post make sure to wrap the string around the post in the opposite direction as the first time you tied on. This allows your strings to cross over each other which will be vital in holding your tomatoes up.

089

   091

7. Once you have run your string on both sides you will want to knot off at the beginning post and cut the string.

8. Now it’s time to prop your tomatoes up using the string.

090

9. As you see above the strings have formed an X. Before you pull the tomatoes up through the two strings I like to continue to twist the strings with will add more tension.

10. Be careful not to snap the tomatoes stem

11. As you move down the string to each tomato twist the strings to add the tension.

093

Your tomato plants should nestle in between the strings allowing stability.

095

As your tomatoes continue to grow you are going to want to add additional string working your way up the post.

098

I just went outside on Monday and added an addition tier which puts me at 3 strings in height. The Tomatoes are looking nice and healthy and have started to flower!

I Can’t wait to be able to use them for all these yummy summer recipes I see posted everywhere!

My next post in the “Green Pinky” series will be on Weed Control

June 5, 2013

The Green Pinky: How to Plot Your Garden

If you have followed through my blogging history you know that I love to garden! I have received many Questions about how we plan out our garden, what we plant, when to harvest, etc. so I decided to created a mini series called “The Green Pinky”.

I would not consider myself a “Green Thumb” at this point in life. That is definitely a term I hold to high standards and well… if you ever saw my Mom’s gardens back in Delaware you would say, “Good God, she has such a green thumb”. That Woman knows her stuff and it shows.

I am merely still learning, but have endless information I can share from running my own green house as an Agriculture teacher, working as a garden intern at a DuPont estate, and being a manager at my Colleges Horticulture Department for 2 summers, and lets not forget the good ol’ Trial by Error approach.

This first post is merely on how to plot a garden. How to decide what will go where, how large to make it, and some helpful hints that I’ve learned over the years.

013

What do I plant!

First things first: You need to decide what it is you want to plant and how much space you are willing to use for the garden. Most homeowners just want a small plot to grow a couple tomatoes, some peppers, maybe some squash, and well peas cause their fun!

Based on those facts last year I made a 12 foot x 12 foot garden.

I wanted to grow:

  • Beef Steak Tomatoes
  • Cherry Tomatoes
  • Green Peppers
  • JalapeƱo Peppers
  • Broccoli
  • Cabbage
  • Rhubarb was already there.

The key to figuring out your garden size is to look at the seed information on the back of the packets. They will tell you how far apart each seedling needs to be. Now I don’t stand out there measuring with a ruler to be exact but the information is helpful.

Note: If this is your first garden start small. You may end up with more Tomatoes then you know what to do with! I would advise: Two of anything you wish to grow is plenty enough for your first garden. If one dies you still have the other as back up.

What size do I make my garden plot?

My garden had mostly compact plants that grow upward. You NEED to consider how the plant grows. If you are wanting pumpkins or melons you need a bigger area to let them sprawl out. I did not plant any last year so my 12’ x 12’ garden worked great.

497

This year {G} and I went LARGE. The garden below is our 2013 garden that is probably 6x’s the size of my mini garden from last year. Why?

We decided on:

  • Slicing Tomatoes
  • Cherry Tomatoes
  • Peppers
  • Jalapeno Peppers
  • Pickling Cucumbers
  • Two varieties of squash
  • Sweet Corn
  • 3 Varieties of Water Melons
  • Jack-o-Lantern Pumpkins

002

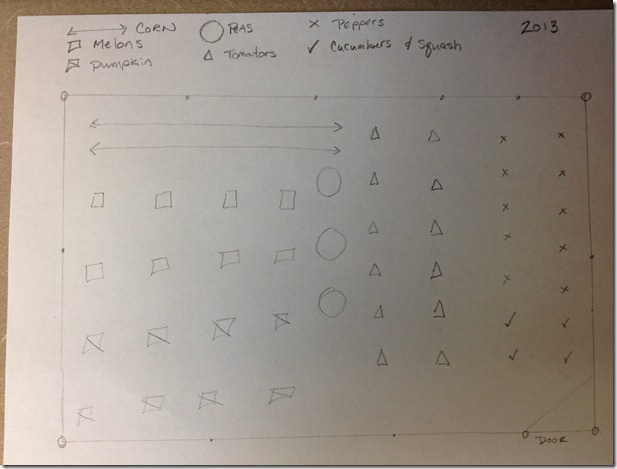
We needed the extra space for the sprawling veggies and of course Sweet Corn. But now how do we decide where everything goes? Well, usually people will draft up a scale drawing of where they want to plant each item. I didn’t draw anything up because I knew how much space things took in previous years and could picture it in my mind how I wanted things to look.

For your sake I did a quick draft of our Garden Plot:
005

Placement and Direction:

Vegetable gardens need to be in direct sunlight so choose wisely. You also may want to consider your nearest source of water for your plants. Pulling out hoses and carrying gallon containers makes a hassle when watering daily.

Our Garden Plot was pre-determined when we bought our house. We could tell (even though there was no garden at the time) that there had been one previously because the soil was not as compact and the grass was more weedy then full. There is a watering spicket at the top of the hill so watering is a little more strenuous. My future goal is to have rain barrels near our garden to ease the job a bit more.

011

The direction you plant items in your garden is going to also impact the plant growth. In my draft above you can see that we planted our sweet corn in the North West corner of our garden with rows going from East to West.

This is done purposely because as the sun rises during the day we did not want our corn to shade out the rest of the garden. If we would’ve planted them from North to South in short rows this would’ve made shade covering plants to the (right) or east.

Row Width/Pathways

Now you have an idea of what you want to plant, how large of an area you have to plant it, where to plot the garden, and have designed a rough idea of how you want to lay out your garden plot… what’s left?

One thing I have learned by trial and error is the width of how far apart to make your rows. On the seed packets it will tell you seed spacing but no one ever says anything about walking between your plants.

Here is my tip for you: Take a rake with you when you go to plant your seedlings. When your ready to start the next row use the rake as a width marker. 108

Why: One word…. WEEDS. I like to rake out or hoe the soil between rows every couple of weeks to keep the weeds down. In last years garden I even laid planks in the rows to suffocate weeds. The amount of space the rake width gives is also adequate for me to move through the rows with a water bucket or a basket during harvesting time without damaging crops.

110

111

Tomato row spacing: After last years garden I doubled the width between my tomato rows. Those puppies get huge and last year I felt like I wasn’t able to maneuver too well in order to harvest my crop.  I had the space to do so.

105

Um… what are those weird circles around your plants?

This is a trick my husband showed me a few years ago. As we plant our seedling we create a little bowl around each plant. When we water we use bucket to pour water around the plants. This also keeps weeds down and helps on water usage because we aren’t watering every square inch of the garden, only the area around the root systems. When you pour the water in the bowls around the seedlings it fills to the brim and you know when to stop. They are like little motes until the water seeps into the ground.

100

109

Hopefully for those of you deciding to start your own garden this helped a little. If you have any questions I am more than willing to try answer what I can.


My next post in the “The Green Pinky” series will be about

How to Stake Tomatoes

instead of buying tomatoes cages.

090

Related Posts Plugin for WordPress, Blogger...