November 30, 2011

Knitting Materials: Tutorial


Finally! I had a little trouble figuring out how to get my videos posted. For some reason posting them directly through blogger was not working. So for those of you that have the same problem go on you tube and upload them there. Then using the movie posting option on your new post select "My youtube videos". You should have no problems!


I was kind of nervous about putting this up but here it goes! The first video is about knitting needles and other items you will need, the differences between them, and my take on using them.


The next video is about yarn and how to read the labels on a skein of yarn. I'm such a rookie at this that when I shot the video everything was upside down... not sure how to fix with it already loaded. So, I'll just learn and move on! Aslo, It makes me laugh, my dog Winston was trying to get my attention so he kept playing his new toy everytime I tried to record this. Finally I said "Oh well" and just stuck with it. Silly puppy. :)


I should also have a video posted soon about how to "cast on" aka "How to start knitting"!

Happy knitting :)

November 29, 2011

The List

Sorry I haven't posted since last week, it has been a crazy Thanksgiving! I had the wonderful blessing of doing some much needed home improvements over my 4 day weekend. Do you have "The List" of items you need to get done around the house? Ours seems to grow over time and some items even get thrown into a "Wish List" or things we really want to do but in all seriousness will never have the time to get around to it. It always seems that when my husband and I get an extended weekend that we end up with a checklist of things that need to get done around the house
.
We had several projects this past weekend:


Day 1 (Friday)
  •  Tear out one wall in George's closet. (We had a hole in the roof that needed patched up, this caused a leak into his closet wall that then caused the plaster to buckle out)
  • Cut and nail new dry wall in closet
  • Mud and tape corners Let dry for 1 day
Day 2 (Saturday)
  • Sand and paint 2 coats of primer (wait to dry)
  • Put up snow fence in front yard in 20 degree weather with 40 mile an hour winds (not fun)
Day 3 (Sunday)
  • Paint 2 final coats of white paint
  • Clean up
  • Vacumm entire house, dust, & sweep


That was basically my weekend. My husband and I did go out for a Date night to Dinner and a movie on Saturday night. We saw The Muppets movie! Not nearly as good and I thought it would be based on my childhood growing up with watching them, but it brought back lots of memories!


I hope that everyone enjoyed their Thanksgiving Break and had something to be thankful for. :)

Comment: What's on your "List" ???

November 23, 2011

T-shirt Necklace Tutorial

Great accessory & easy to make!

The first time I saw a t-shirt necklace was when I first joined pinterest.com
Pinterest is a community that allows you to browse items that others have posted to give you ideas on style, household, holiday, food & beverages, photography, and the list could go on. If you're not on pinterest.com and love finding inspiration for everyday life then you should join. :)

The t-shirt necklaces are becoming popular, just the other day I saw one in a coffee shop selling for, I think around $9.00? That's crazy people! Don't buy one, make one! I followed the tutorial I found on pinterest.com last night and it really took less then 10 minutes to make & and I had to start one over so really it shouldn't take that long.

I don't want to steal from ideas so I'm going to post the tutorial I used then give you my insight on the process.

Click the picture for t-shirt necklace tutorial

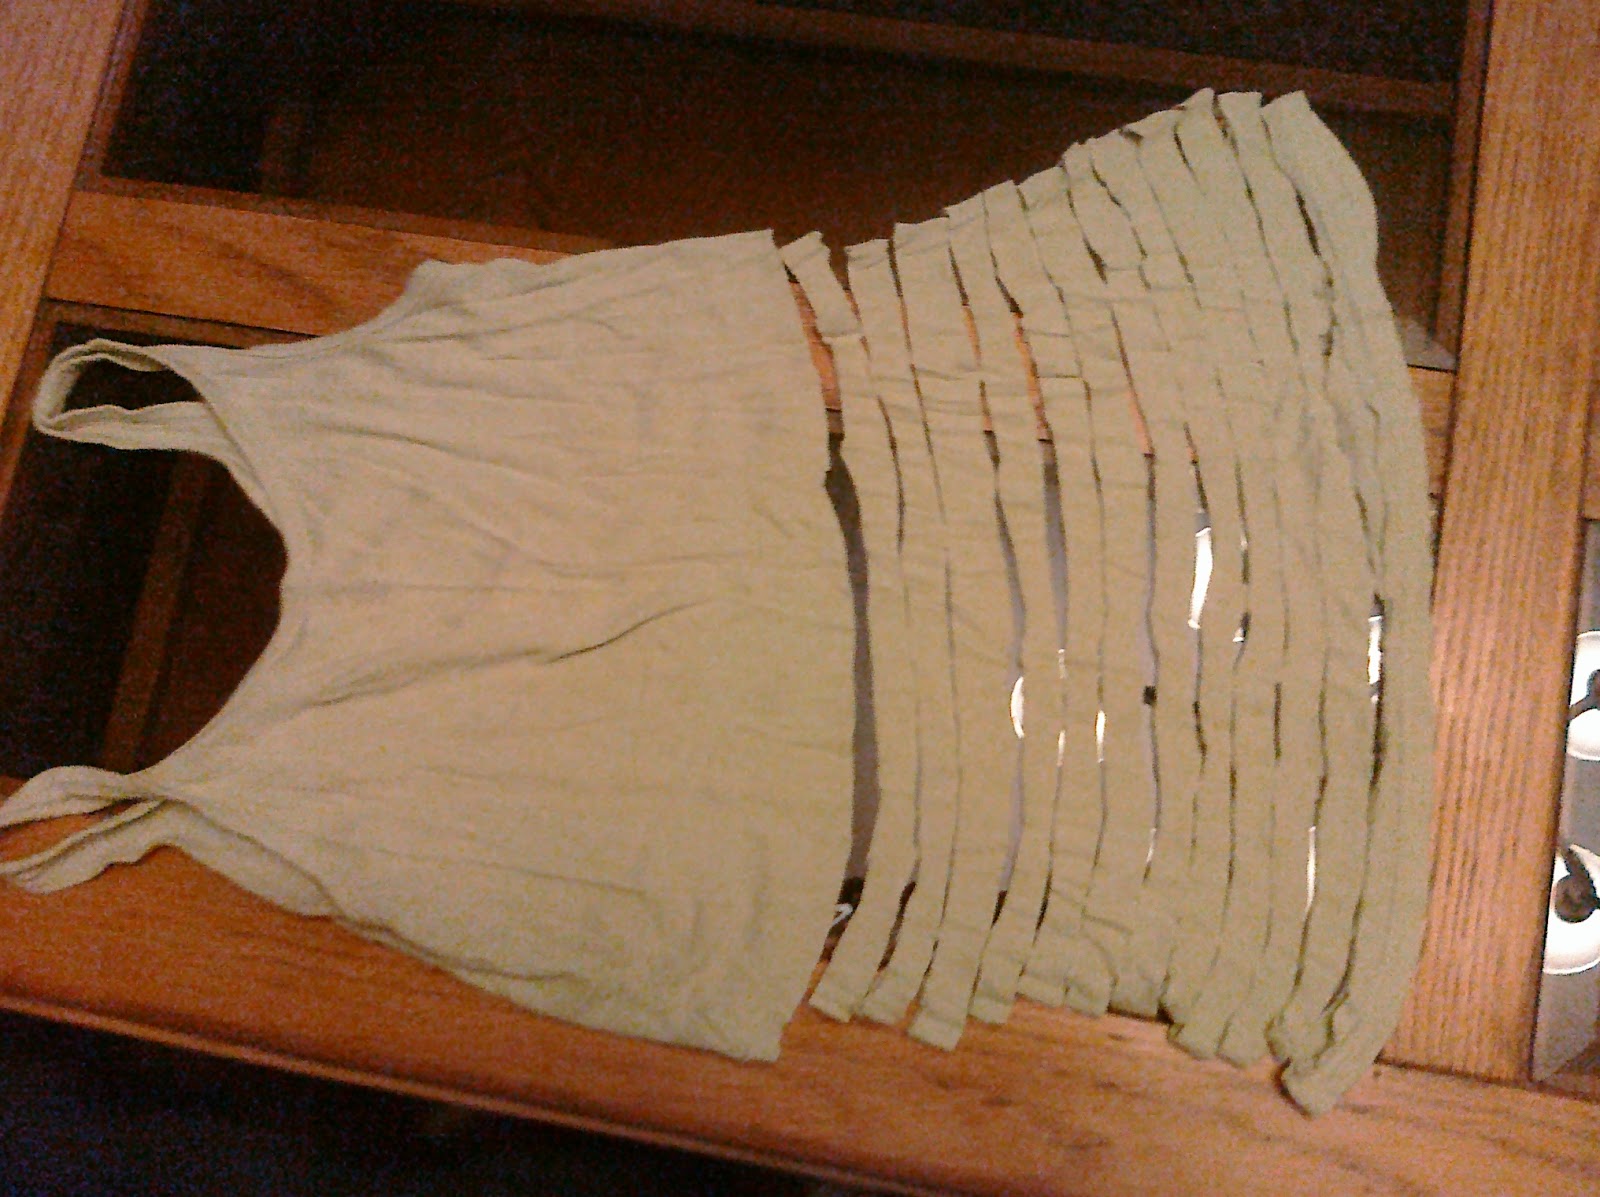
Here is some little bits I would like to add to this. My first shot with making this did not work. I got this far...


The tank top I used was way to thin and worn so the elastic in the cotton would not stretch. So in the next step when you take the peices and stretch them they should curl into strands... mine did not. They frayed apart making a complete mess. On my next try I used an old work shirt that I NEVER wear. I keep holding onto it because I like the pattern but still I never wear it. So I took a deep breath and cut up that shirt.

I know I'm silly for cutting this one up but I wanted to experiment with the pattern.

After I cut this one just like in the picture above, I stretched it and it curled into the strands that you need. Note to those out there wanting a pattern on your t-shirt necklace: It doesn't work. When you cut the shirt material it will always curl the opposite of the patterns surface so inside-out. You will still see the pattern through the strands but it is not as vibrant as what the pattern is on the rightside out. So for those of you attempting this don't expect to see that in your finished product.

After I stretched it I actually looped to twice so the strands weren't as long. Then I took another peice of the t-shirt and wrapped it around the seams at the neck and tied it off.

Here is the final product!


I can't wait to make more. Remember this could be a great stocking stuffer for friends and family & it won't cost you a thing because you already own a stack of t-shirts that are probably sitting in a drawer somewhere in your house!

Please comment if you have made one or after you have tried this tutorial! Also, don't forget to become a follower on my blog. :)


November 22, 2011

Anyone can knit... Yes I mean you!


I am starting a tutorial on my blog about Knitting. I think that it is a craft that a lot of us are afraid to start especially if you don't have anyone to teach you in person. As long as you have the patience to try and of course start over again and again you can also learn to knit! I started knitting when I was in high school, my mom taught my sisters and myself. Now, when I say I started knitting, simply, I mean that my mom casted on the first couple rows of stitches and I continued the rest in a straight line until I need to bind off and then handed it back to my mom to finish. :)

Before I got married I lived with Amy and she is a gurue of knitting! We would be watching tv or movies and she would be knitting socks, a baby hat for her newborn neice, hats, gloves... you name it! I was fascinated but it just looked way to complicated for me to comprehend.

Last christmas my mom gave me a wonderful book that has both knitting and crocheting patterns. I read the introduction on how to cast on & knit different patterns but I was still unable to comprehend how to read the patterns (since they seem to be like reading spanish for the first time) and I couldn't get out of my rut with only making simple knit scarves.

That was until I start utilizing the internet! During christmas break I started watching youtube tutorials. The first was, how to cast on with knitting. Next was how to purl. Next was how to knit and purl every other row. Next was how to use circular needles and so on.

I am still not a pro by any means, but I have gotten out of my rut and have made new items such as a Brule' Scarf with buttons and button holes (Still simple but a step up from basic), a cowl kneck scarf, knitted kitchen towels to dry your hands, and soon to come some more items that are christmas gifts that I can not repeat here as stated in yesterday's blog. I've self taught myself through the online knitting community and I know that you can too!

I will start out easy and go through my projects step by step. I will also hopefully add in some videos myself that you can follow.

Here are the only 2 items you need to get started:

Knitting Needles: When purchasing knitting needles there will be a gauge size (how big around they are) along with a length size. Usually it is written: 4.5mm 7 Size 12 Inch Single Point Bamboo Knitting Needles * I would recommend starting with a size 7 or 8 gauge needle with the length of 12 inches. I prefer to use metal but for beginners I would use the plastic, the yarn doesn't slip off nearly as fast.

Red Heart Super Saver Jumbo 784 Bonbon 10 ozYarn: There are so many different types of yarn, I recommend for beginners to start with a cheaper yarn to teach yourself with. I'm not sure how many times I started a project and then pulled it apart and started over. You're just beginning so don't waste money on yarns that are expensive until you know your ready to work with them. Walmart sells "Red Heart" super saver yarn. I would start with that in learning how to cast on and knit. The fibers don't spilt apart and you can see your stitches better. It's not the softest stuff but again you're just learning! Also, the "heavier" meaning thicker the yarn the fast the knitting goes. Also, make sure to buy enough of the yarn for your project, most yarns comes at a length os 250ft... it takes me two sets to make one long scarf.

Tomorrow I will go into more detail about Knitting "Language" and how to read patterns and I will show a short video on how to cast on (Start) your first few rows of knitting! Hope you will learn along besides me!

Here are some pictures of my Brule' Scarf! Took them at work so don't mind my silly background bulletins!


Start by having the button end up at chest level.

Circle scarf around head once and put button through button holes.

Tuck into a jacket as you zip it up.
(Of course I don't wear my scarf with my sweaters it's just to show what it looks like tucked in. :)

Seriously, my favorite scarf of this past fall season! I love the color I picked and it's made from alpaca so it's super soft and not itchy. I believe the yarn cost me 6.50 a peice and I used two skeins (balls) of 250 ft so $13.00 plus 1 pk. button at .99cents so $13.99 for my scarf plus the satifaction that I can say I made it when people comment. :)  

Time to make one up for winter time!

*My tutorial will be added to to top of my blog next to the home page button.


November 21, 2011

Black Friday Savings!


I have never been one to want to go out at 3am to shop on Black Friday, so in my expereinces I have not seen a crowd like in the picture above fighting for the "gotta have gift" of the year. I will take my chances by going out around 10am or so. I haven't really had the need to go out on a Black Friday morning. I don't have kids so I don't need to stand in line for the newest tickle me elmo doll. I would never buy a flat screen tv with out asking my husband because I would pick the WRONG one. And for my most part I am more of a make the gift yourself kind of person and throw in little cute items with it. I'm not sure if people take that as being cheap, but I would think all the hours I put into the gifts would mean more. For that reason, I'm kind of sad I can't post my projects that I am working on for gifting this year. I recently found out my little sister actaully reads my blog now so I gotta hold off until after christmas. I will post all the gifts though, they are super cute!
As for you crazy black friday shoppers here's a great link my co-worker gave me. It will tell you all the deals for any store your looking at going to! As for me, I will be shopping online for deals. It's a little safer and I can sleep in. :)

Tis the Season... Happy Shopping!


November 18, 2011

Photoshop needs a manual!


I'm not sure about everyone else out there but I just got my photoshop up and running and it is not as easy as it looks! It took me forever to figure out how to change the image above to the reverted black and white. Picaso is so much simpilar to use if your looking to do quick edits.

I'm really not sure why it doesn't have a tuturial with it as well, and if it does I didn't find it. There are some short clips of how to do thing but they don't even show you what they are clicking on and it goes so fast you have to keep rewinding! The only reason I found out how to fix the picture above was by watching a Youtube video.

This is definately going to take some time! If you have any suggestions please comment! :) 

November 17, 2011

Cupcake Vineyards!


My birthday just pasted in October and I recieved a wonderful gift from my brother back east. He know how I love to cuddle up with a warm blanket, some fluffy PJ's, and sip on a glass of wine after a rough week at work. I'm sure sure if he googled "Fantastic Birthday Present for Sisters who love Wine" but that would be my guess. In the mail I received a beautiful box with these three bottles inside wrapped nicely with a birthday card. The wine is from Cupcake Vineyards! Super cute name if you ask me. In the package I received three different types a Chardonnay, Merlot, and Cabernet Sauvignon (Yes, I had to spell check those). 


I am more of a white wine connoisseur however, what I do like about these wines is that on the back label it gives you an idea of what to pair the wine with for a lovely meal. I will need to branch out and try the Merlot next time my husband and I have a steak dinner, and for sure will have to try Brie with crackers for the Cabernet Sauvignon. As for the Chardonnay....


Whoops... I already indulged! It says to have this with Crabcakes, ahi tuna, or a white fish. Maybe next time. :)  When I am not drinking them, they are stored beautifully across the top of my kitche cabinets. I hope you will keep this wine in mind next time you need a cute twist on a wine present, not only great for birthdays but how about for a Bridal Shower or Bachelorette Party?


November 16, 2011

Birchbox Newbie!


One of the bloggers I follow on a daily basis now is "The Small Things Blog". Kate is amazing with hair tutorials and knows the ins and outs on great ideas for fashion deals. Anyway, one of the things I was super curious about is this Birch Box Collection. Basically, it is a little box that comes to you once a month for $10 and gives you tiny samples of perfumes, nail polish, lotions, makeup, etc. Then you can sample them, and if you want to buy the larger size you just go on their site. The neat thing is when your register you have to fill out a profile survey so they can send you a box that is specific to your style. My favorite part of this was comparing "The Small Things Blog" and what she received verses what I received based on our different profiles.

The cutest little box that I plan to save and re-use at Christmas!

Opening my first Birchbox.

Two body lotions, lip gloss/plumper, Kate Spade perfume, and Zoya professional nail polish

My take on each of the items. I received the box on Monday so I have had two days to try out different items.

  • Thymes eucalyptus body lotion: Upon using it the for first time yesterday morning. I was just settling in from work and it was super cold out so my hands were dry. Immediately after using it my boss stopped in to ask a question and said "It smells really clean in here". So although the lotion was nice it does smell up a room when you put it on. Beware if your wearing perfume as well, you don't want to give other migraines!
  • Jouer lip enhancer: FANTASTIC! ok, I am also a closet lip gloss hoarder, meaning most all of my bags, purses, and desk drawers either chap stick, lip stick, lip gloss, of all different brands buried in them. So I feel that I can truly say this is an awesome lip gloss. It makes your lips super smooth, doesn't dry out right away, gives a nice gloss to your natural lip color with out looking too shiny, and when you sip your cup of coffee in the morning it doesn't peel off your lips so you don't have to keep reapplying over and over again.
  • Kate Spade Twirl Perfume: Although it is a quality perfume when I put it on I feel like I should be going to a fancy black dress party on New Years Eve. So for that I will, but as for everyday use I think it's too strong and not a day time go to work perfume. I will keep it in mind for Fancy date nights.
  • Thymes Kimono Rose Body Lotion: I put this on this morning after my shower and fell in love with it. The scent is exactly what I like, not strong yet subtle enough to wear if your not into perfumes. It is soft and made me sad when I used it all up. Really wishing I would've had that in the small bottle instead of the eucalyptus.
  • Zoya Nail Polish- This one I have not gotten the chance to use yet. I am strict on not crossing holiday boarders before the season. The color is more of a Winter feel so once we get into December is when I feel it is appropriate. I'm not saying that you other holiday lovers can't wear it before, it's just not my style.
  • Hair tie: Ok, so the hair band is not even in the picture because when I went through the box I didn't realize it was a hair tie. I thought it was attached to another item and just fell off. I realized what it was when I read my birchbox card explaining when each item was and saw that it was meant to be a hair tie. I won't even put it on there because I could make it myself and refuse for anyone to pay "$12 for 6 hair ties". That is craziness!

As for the prices, I will have to edit this later on when I have the price card on me. I am happy that I did subscribe to birchbox because it truly does beat buying an item without trying it first. I will be buying the Jouer Lip gloss!

Oh yeah! Click the picture at the very top to go to birchbox.com!

November 15, 2011

The Sixty Six Blog's Inspiration

Bob and Betty Hutton
1945-2011

Last May I got the opportunity to go back east for a wedding and while I was excited for that it also gave me the chance to visit my family and most importantly my grandparents. My Pop-pop was on a roller coaster for almost 6 years and it was looking to be the last time I was going to be able to spend time with him. While I was down at their house in Ocean City, MD my Grammie and I went through a huge bag of photos that she had from her childhood and over her entire life. I came across this one and it just brings a tear to my eye everytime I think about them together. If you are a girl then I'm sure that the movie "The Notebook" is one of your all time favorite romances. I am lucky enough to know a couple that depicts that lifetime and that idea of love.

They met through friends when my Grammie was just 14years old and my pop-pop was 17. The dated for 3 years and then the war came (WWII). My pop-pop enlisted voluntarally against his parents wishes became a soilder under the 350th Infantry 88th Division, Anti-Tank Company in Africa and Italy. To this day my grammie has letters that he wrote to her during that time. When he returned injured from stepping on a land mind my Grammie helped nurse him back to health. They later married when she was just 18 years old. Until this last summer they had been married for 66 years when he passed July 27th, 2011.

I suppose that I am a bit of a romantic, but how can you not be when you hear true storys that are beyond what people think marriage is today. Now, I know that every marriage has its low points but the possibility of making it through those low points is inspiring. My pop-pop was a good man, he even told me once that on his way home on Fridays from working maintenance at the hospital he would stop at a corner street a pay a nickel to buy my grammie flowers. He did that every Friday.

So here's to sixty six years of love, family, and friends and here's to hoping you will continue to read this blog which will be about life and what I make of it.

Sixty Six years

November 14, 2011

Finally Blogging!

Ok, so when it comes to this kind of stuff I'm a bit of a perfectionist. I want my Blog to look the best. I have seriously spent a week working through different templates, headers, colors, text, and none of it was my style. I just kept going off of other blogs I've read, or borrowing HTML from free template sites and STILL I wasn't happy. Maybe a floral background, no... ok how about a scrapbook looking style, no.... what about a vintage, naaaaa. Then FINALLY i downloaded Picasa by Goggle which lead me to Picnik... a photo shopping online device. I started playing around with photos that I had saved on my computer, then from saved USB photos and came across this one.


Sparrow in a bird house.

I took this picture when I was a garden intern at Winterthur Garden and Estate the summer after I graduated from college. The estate was owned by a DuPont... yes that's right, ere to the DuPont Company. His estate has a 10 story mansion surrounded by gardens that he planted himself. It was also a self-sustaining community with a working farm, dairy, greenhouse, and train station. The train station was converted to intern housing which was pretty awesome to live in. I will upload pictures in later blogs from my internship.

I love this picture and for that it became my header, perfected by Picnik of course! You can see the obvious difference between the one above and the one in the header. My decision for the template and background colors is that I'm a simple person... I really wanted to keep the Blog looking Clean and with a Fresh layout. When it comes to adding photos and additions thats where I would rather put my spin on it making it more colorful and unique. For now it's a work in progress. 

I will continue to use Picasa as I upload photos in my blog, and also encourage everyone else to use it! I also just ordered Photoshop for my MAC laptop since I would really like to retouch my wedding photos. My husband and I decided to save money by not hiring a professional photographer... good idea but now I want photos that give a little more then what we have.

As far as the title of my blog.... please tune in tomorrow. :)


Related Posts Plugin for WordPress, Blogger...